Archive | September, 2011

Banana Flambé with Vanilla Ice Cream and Almonds

15 Sep

Ingredients
1 medium, ripe banana
1 tablespoon butter
1 teaspoon honey
1/2 teaspoon brown sugar
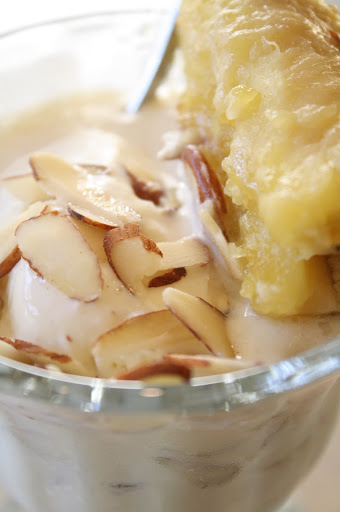
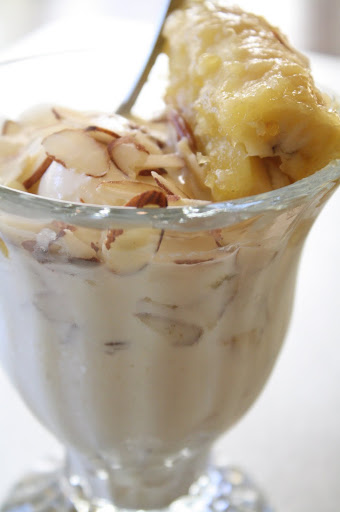
3 tablespoons sliced almonds
1/2 cup vanilla ice cream


1. Bring a saucepan to medium-high heat. Melt the butter, coating the entire face of the pan. Add the honey and allow for it to bubble Slice the banana in half, length-wise and then again, cross-wise. Place the four slices face-down in the saucepan.
2. Using a fork, turn the slices after two minutes have elapsed. Once softened, sprinkle an equal amount of brown sugar on the inside faces of the slices. Flip the bananas again so the brown sugar-coated side faces down. Cook for an additional two minutes then remove the pan from the burner.
3. To assemble, obtain a deep smoothie cup or glass. Pour one tablespoon of sliced almonds in the bottom of the cup. Place one banana slice over the almonds and top with 1/4 cup ice cream. Repeat the process one time and finish the dessert with two banana slices and almonds sprinkled on top.
*You must serve while the banana slices are still warm.


I was first introduced to this recipe in elementary school, during my core experimental years when all I knew about dessert was Betty Crocker brownie mix and pre-made Nestle cookie dough. Preparing the flambé, I remember feeling incredibly independent in the kitchen, creative and in-control. I shooed my mother away when she offered her help, focusing intently on crafting the perfect homemade dessert. I scooped the ice cream carefully and sprinkled the almonds precisely. I savored each and every bite, unashamedly proud of my creation. Today, this simple, charming banana flambé remains a favorite of mine. It is an ideal recipe to have under your belt for those casual weeknights when you crave something sweet but have neither the time nor energy to pull together an extravagant dessert. With its hasty preparation and cleanup, my beloved banana flambé will soon become a staple of your repertoire as well.

Brown Sugar Chocolate Chunk Cookies

3 Sep

Recipe adapted from Not Without Salt

Ingredients
2 sticks unsalted butter, softened
1/4 cup granulated sugar
1 1/2 cups brown sugar
2 eggs
2 teaspoons vanilla extract
3 1/2 cups all-purpose flour
1 1/2 teaspoons baking soda
3/4 teaspoon salt
9 1/2 ounces good-quality milk chocolate, cut into chunks using a serrated knife
Sea salt


Makes around 50 cookies.

1. Using an electric mixer equipped with a paddle attachment, cream the butter and sugar on medium-high speed until light and fluffy, about 5-7 minutes. Scrape down the sides of the bowl when necessary. Continue mixing while adding the eggs one at a time, fully incorporating each egg before adding the next. Add the vanilla extract.
2. In a medium bowl, combine the flour, baking soda, and salt. With the mixer on low speed, slowly add the flour mixture. Mix until just combined, ensuring not to over mix. Using a spatula, fold in the chocolate chunks.
3. Using a small ice cream scoop, place the cookies one inch apart on a baking sheet. Gently press down the dough balls with the palm of your hand and sprinkle each scoop with a bit of sea salt. Bake at 360 degrees for 12 minutes. Remove the cookies from the oven and allow them to bake an additional two minutes on the baking sheet. Place the cookies on a cooling rack to cool.
*You can store the dough in plastic wrap in the refrigerator for up to 10 days.


With thousands of available variations of this beloved cookie, why try mine? Why stray from your reliable chocolate chip cookie recipe- one you have already established as the best -into unknown territory? Allow me to explain. The brown sugar provides an organic sweetness and fluffiness to the dough that contrasts perfectly with the decadent milk chocolate chunks and savory sea salt. So good was the first time I tried this cookie that I savored each bite, not leaving a single crumb on my plate. Served warm with a scoop of vanilla ice cream, this heavenly cookie makes the perfect, crowd-pleasing dessert. The raw dough is sinfully addictive and almost too dangerous to store in the refrigerator on its own. This recipe will soon become a kitchen staple, on-hand whenever you are in need of a quick dessert or a special treat to satisfy your sweet tooth.