Archive | Snack RSS feed for this section

Ma’amoul Cookies from my Great Aunt’s Armenian Vegan Cookbook

2 Jun

IMG_0708

While my family has always appreciated good meals, as a child, I seldom spent time in the kitchen. I cultivated my interest in food independently, experimenting with recipes, photographing, and sharing these experiences on my blog. As I grew older, my love of food and my Armenian heritage became defining aspects of my identity. I longed to learn about traditional Armenian cuisine, but did not know where to begin. That was until my great aunt, Dikranouhi Kirazian, released her new cookbook entitled Armenian Vegan. 

IMG_0726

IMG_0722

Armenian Vegan contains more than 200 traditional Armenian recipes, including appetizers, breads, main courses, and desserts, using no animal products. For seven years, my aunt secretly labored over this book with the help of her husband, George. She told no one about the project, leaving my extended family in shock upon receiving copies in the mail.

I relished flipping through the pages, discovering recipes that I had never heard of before along with vegan adaptations of classic dishes. Dikranouhi presents a practical and healthy approach to cooking, with simple instructions and ingredients accessible to novice cooks. She writes thoughtfully, sharing personal anecdotes and the cultural significance behind certain foods.

IMG_0730

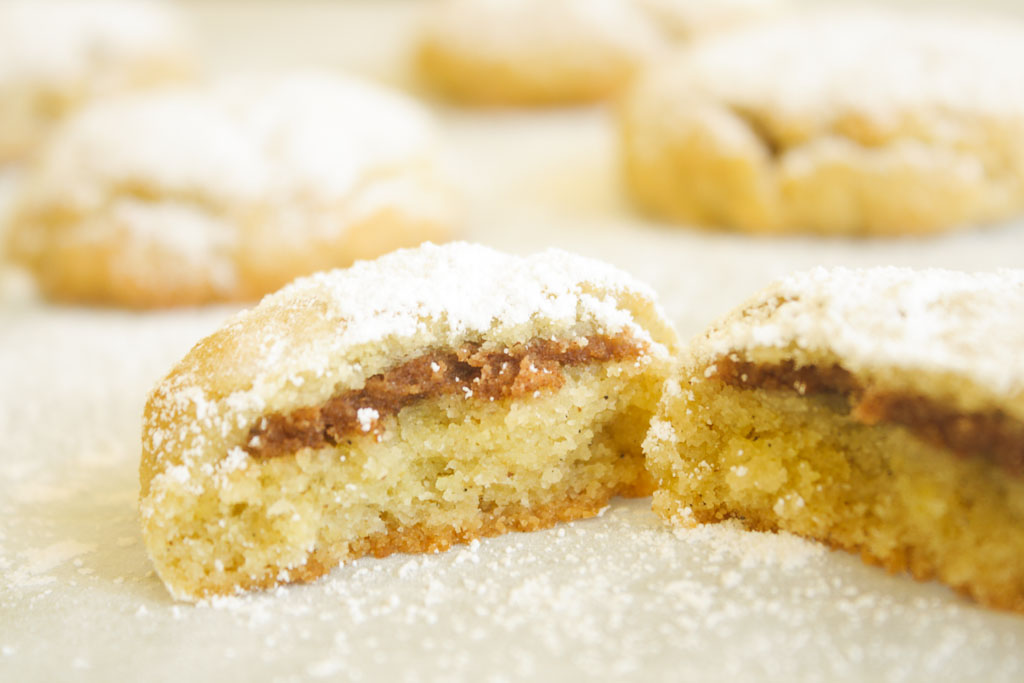
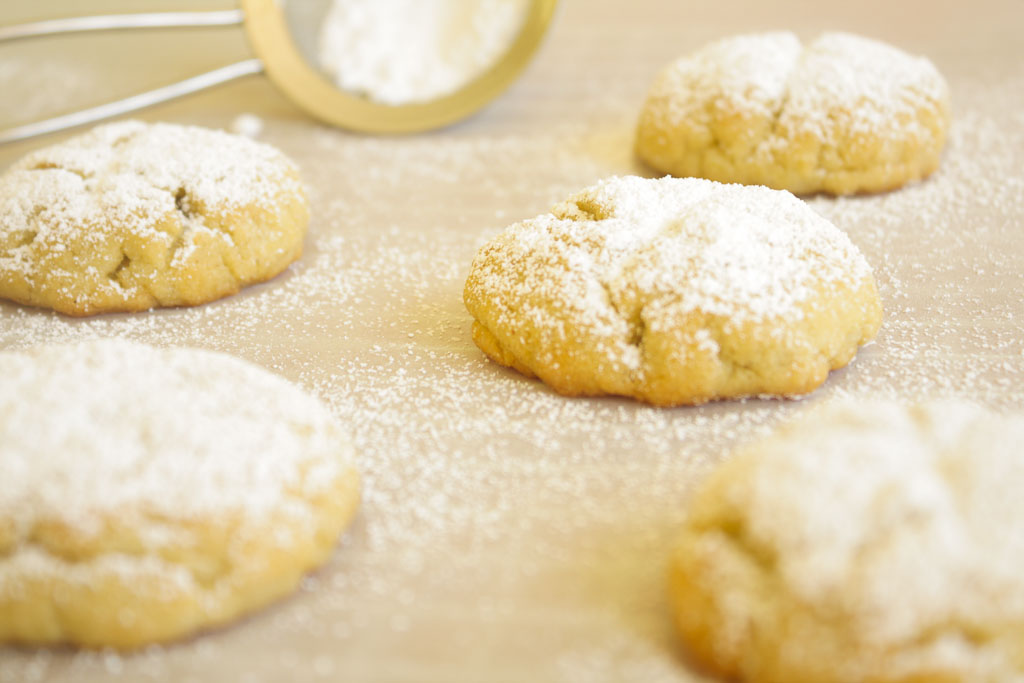
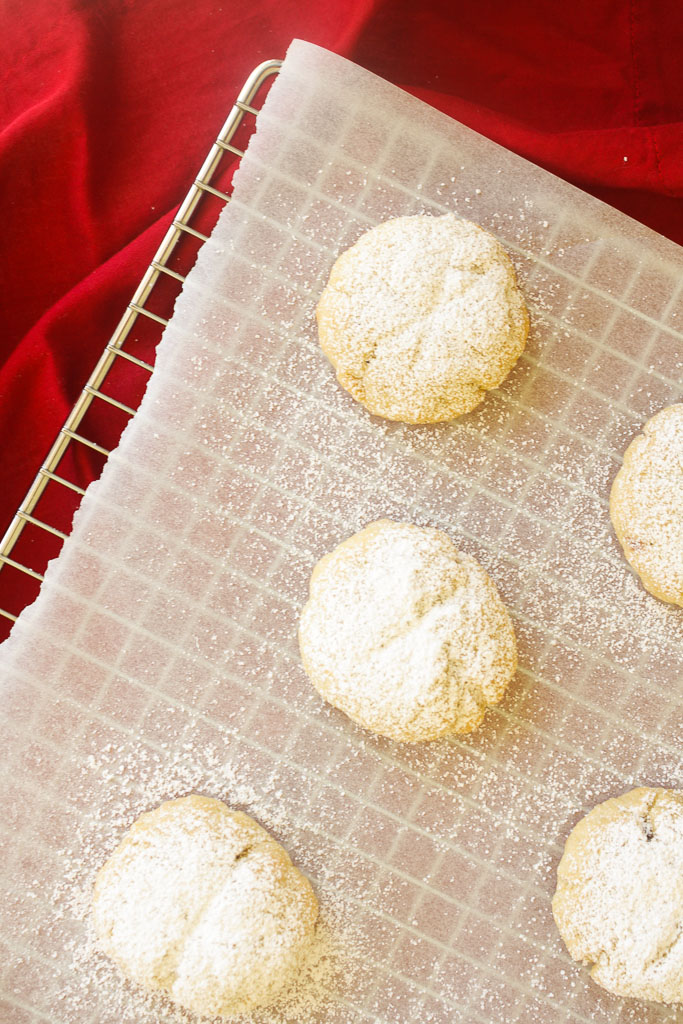
While reading the dessert section, these walnut-stuffed cookies caught my eye. Flavored with Mahlab, ground cherry pits, and delicate rose water, Ma’amoul are ubiquitous throughout the Middle East. I substituted a few ingredients based on what I had on hand, replacing Mahlab with ground cardamom and rose water with orange blossom water.

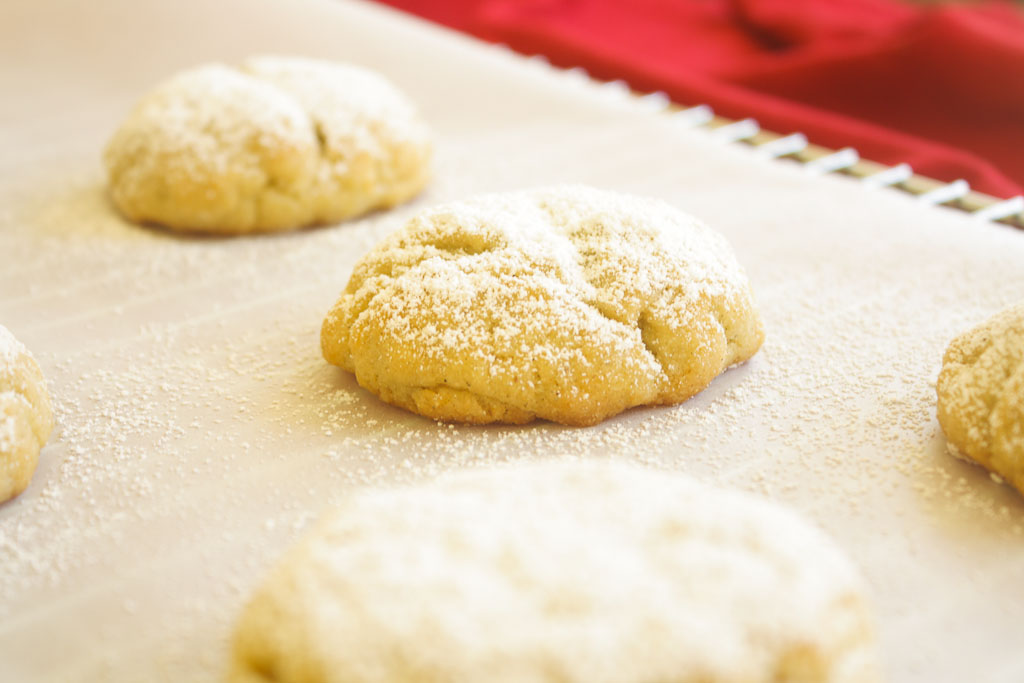
Though somewhat time-consuming to shape, these cookies’ handmade touch contributes to their charm. While nestling the sweet walnut filling inside a pocket of supple dough, I imagined my aunt learning this technique when she was a girl. Feeling a personal connection to a recipe makes eating it so much more fulfilling. Most importantly, however, the flavors here are wonderful. Semolina flour, traditionally used to make pasta, provides a toothsome texture and tender crumb, its robustness offset by a sliver of walnut-cinnamon paste. To finish, an elegant coating of powdered sugar makes these dainty treats ideal for serving alongside a cup of tea.

IMG_0715

Recipe adapted from Armenian Vegan 

These cookies can be adapted using various nuts and spices. Possible combinations include pistachio and rose water or date and orange blossom water. 

For the cookie dough:

  • 2 1/4 cups farina or semolina flour
  • 1 cup all-purpose flour
  • 1/2 cup granulated sugar
  • 1 teaspoon cardamon, preferably freshly ground
  • 1 teaspoon baking powder
  • 1/2 teaspoon baking soda
  • 1/4 teaspoon salt
  • 1 cup melted margarine or butter (for non-vegan option), melted and cooled
  • 1/2 cup soy milk or cow’s milk (for non-vegan)
  • 2-4 tablespoons orange blossom or rose water

For the walnut filling:

  • 1 cup chopped walnuts
  • 1/4 cup granulated sugar
  • 1 1/2 teaspoons cinnamon
  • Pinch of nutmeg
  • Pinch of allspice
  • Powdered sugar for dusting

Yields about two dozen cookies.

1. In a large bowl, sift the flour, baking powder, and baking soda. Add the farina or semolina flour, sugar, salt, and ground cardamom and mix thoroughly with a whisk or fork. Mix in melted margarine or butter with a spoon. Bring milk to a boil, add to the flour mixture, and mix well. Knead the dough with your hands until it reaches a smooth pasty consistency, about 1 minute. Add the orange blossom or rose water, knead a few more times to combine. Cover the bowl with plastic wrap and allow the dough to rest at room temperature for 2-3 hours.

2. Meanwhile, make walnut filling. Place walnuts, sugar, cinnamon, nutmeg, and allspice into a small food processor. Process on high speed until the mixture reaches a moist, pasty consistency, about 1 minute.

3. Preheat the oven to 350 degrees F. Place racks in the lower and upper thirds of the oven. When the dough is ready, measure out tablespoons of dough. Roll each piece into a ball and make an indent in the center, creating a little cup. Place 3/4 teaspoon of walnut paste into the cup, flatten it, then place another flattened ball of dough on top. Seal the seams tightly but carefully with you fingers. Repeat with remaining dough. If you own a Ma’amoul mold, you may use it instead.

4. Place stuffed cookies an inch apart on a baking sheet lined with parchment paper. Bake for 10 minutes on the lower level of the oven, then transfer them to the top shelf for an additional 3-5 minutes, until lightly golden brown. Transfer the parchment onto a cooling rack, and allow the cookies to cool completely. Once cool, dust cookies with powdered sugar.

My Favorite Banana Bread

25 Feb

When I first began baking, I insisted that everything I made was absolutely delicious. I fiercely defended my rock-hard pound cakes, puddle-shaped sugar cookies, and acridly-sweet brownies. Over time, I learned that one must accept failure in order to develop outstanding recipes. Few baked goods come out perfect after the first try, and even then, an experienced baker will elevate them from great to excellent. My tireless pursuit of the perfect banana bread taught me this invaluable lesson.

When it comes to classic American treats, everyone has different preferences. Through sampling countless banana breads, from bakeries and my own kitchen, I formulated an ideal version in my mind. A moist, fragrant loaf with a tender crumb and cake-like consistency, this recipe achieved my goal.

This bread appeals to banana purists. Beating the butter and brown sugar creates a light, fluffy texture and a nice lift to the crust. This technique yields an end product closer to a tea cake than a spongy, dense quick bread. Even though it’s wonderful plain, sliced thick and smeared with a dab of butter, I can’t wait to spice it up with chocolate chunks, nuts, and coconut flakes. Because even my perfect recipe offers infinite opportunities for improvement.

Recipe adapted from Donna Hay Magazine via Sweetie’s Home

Adding a handful of walnuts provides a pleasant crunch and toasty flavor.

  • 8 tblsp (1 stick) of unsalted butter, at room temperature
  • 3/4 cup brown sugar
  • 1/4 cup honey
  • 1 tsp vanilla extract
  • 2 eggs, at room temperature
  • 2 cups of mashed, ripe bananas (about 4 large bananas)
  • 2 cups all-purpose flour
  • 1 tsp baking powder
  • 1 tsp baking soda
  • 1 tsp ground cinnamon
  • 1/2 tsp fine sea salt
  • 1/2 cup toasted, chopped walnuts (optional)

1. Preheat the oven to 350° F. Grease a 9×5-inch loaf pan with butter. Using a stand mixer equipped with a paddle attachment, beat the butter and brown sugar on medium-high speed until light and fluffy, about 3-5 minutes. Add the honey and beat for another minute, or until thoroughly combined. Reduce the mixer to medium speed, and add the eggs one at a time. Add the vanilla extract and banana and mix until thoroughly combined, scraping down the sides of the bowl when necessary.

2. In a medium bowl, whisk together the flour, baking powder, baking soda, cinnamon, salt, and walnuts. On low speed, add the dry ingredients to the wet ingredients, mixing until just barely combined. A few streaks of flour are OK.

3. Pour the batter into the prepared pan and spread evenly. Bake for 55-65 minutes, or until a toothpick inserted into the center of the bread comes out with moist crumbs attached. Cool in pan on a cooling rack for 10 minutes, then remove the bread and allow it to cool completely.

Lemon-Rosemary Scones with Golden Raisins

8 Jan

When I joined my high school student newspaper staff, I learned about the concept of evergreen articles. In journalism, the term “evergreen” describes stories that remain relevant over long periods. I think this same concept can be applied to baking. No matter what ingredients are popular at the moment, people will always be on the lookout for certain basic recipes.

Brownies, chocolate chip cookies, and blueberry muffins are classics that every home baker should have in his or her arsenal. Cream scones also belong in this category of essential baked goods–buttery morsels with slightly crunchy tops and fluffy, tender interiors. Despite this pastry’s seeming simplicity, all the renditions I tried came up short from the light-as-air scone of my dreams. So I turned to Baking Illustrated, a source known for extensive testing and detailed instructions, and finally found what I was searching for.

These cream scones provide an ideal base for all sorts of add-ins. The rosemary’s herbaceous flavor offsets the pastry’s richness and contrasts well with the tangy lemon zest and plump, sweet golden raisins. To achieve flaky, buttery layers, it is key to handle the dough minimally and efficiently. Use a food processor to prevent the dough from overheating, and cut the scones with a sharp knife to ensure maximum lift. And there you have it! An endlessly adaptable cream scone recipe that will never go out of style.

Look at those flaky layers

Basic cream scone recipe courtesy of Baking Illustrated

  • 2 cups all-purpose flour, preferably a low-protein brand such as Gold Medal or Pillsbury
  • 1 tblsp baking powder
  • 2 tblsp sugar
  • 1/2 tsp salt
  • 5 tblsp cold unsalted butter, cut into chunks
  • 1/2 cup golden raisins (or other dried fruit of choice)
  • 1 cup cold heavy cream
  • 1 tblsp freshly grated lemon zest
  • 1 tblsp finely diced fresh rosemary

Yields 8 scones.

1. Adjust the oven rack to the middle position and preheat to 425° F. Mix the lemon zest and rosemary into the cream, and allow it to steep in the refrigerator for 10-15 minutes.

2. Whisk the flour, baking powder, sugar, and salt together in a large bowl. Place this mixture into the workbowl of a food processor equipped with a metal blade. Scatter the chunks of butter evenly over the dry ingredients. Cover and process with 10 one-second pulses, or until the dough resembles coarse pebbles.

3. Remove the blade and transfer the mixture back into the separate bowl. Gently stir in the cream with a fork or rubber spatula until the dough begins to form, about 30 seconds. Transfer the dough and loose flour bits to a clean work surface and knead the dough until it comes together into a rough, slightly sticky ball, 5 to 10 seconds.

4. Gently press the dough into an 8-inch round cake pan, release the round, and cut it into 8 wedges using a very sharp chef’s knife or bench scraper. Place the wedges 1/2 an inch apart on an ungreased baking sheet. Bake until the scone tops are lightly brown, 12-15 minutes. Cool on a wire rack for at least 10 minutes. Serve warm or at room temperature.

Peanut Butter Blondies

3 Jan

At the beginning of January, most food blogs share healthy recipes to help you recover from holiday indulgences and commit to your New Year’s resolutions. Even though I am all about kale salad right now (because it tastes delicious), maintaining a truly healthy diet requires balance. An article I read in the New York Times re-affirmed this belief. I love to bake and consume sweets almost every day, but in moderation, which is key. If my diet centers around fresh produce, whole grains, and lean meats, there is nothing wrong with enjoying quality, homemade baked goods. Which leads me to these peanut butter blondies.

Peanut butter is a quintessential American food. However, despite its ubiquity, most people either love it or they hate it. My dad was of the latter camp, and for years, I tried in vain to convert him. I slathered peanut butter on brioche toast, sandwiched it between shortbread, and even sacrificed some of my beloved Girl Scout cookies to the cause. These magical little bars finally inspired him to see the light.

The blondies have an undeniable peanut flavor without being too rich or overpowering. The saltiness of the roasted peanuts contrasts perfectly with the sweetness of the chocolate chunks, and best of all, the batter takes minutes to mix up in a saucepan. My dad ate two in a matter of minutes, and was disappointed when they were all gone. So, what are you waiting for? It’s 2014. Let’s celebrate with some peanut butter blondies.

Recipe courtesy of Chewy Gooey Crispy Crunchy by Alice Medrich

  • 1 cup all-purpose flour
  • 1/2 tsp baking powder
  • 1/4 tsp salt
  • 8 tblsp (1 stick) unsalted butter
  • 2/3 cup packed light brown sugar
  • 1/3 cup well-stirred natural, salted peanut butter (smooth)
  • 1 large egg
  • 1/2 tsp pure vanilla extract
  • 1/2 cup roasted peanuts
  • 1/2 cup (3 oz) semisweet chocolate chips or chunks

Yields 16 blondies.

1. Line the bottom and all four sides of an 8-inch square pan with foil. Position a rack in the lower third of the oven and preheat to 350° F.

2. Combine the flour, baking powder, and salt in a small bowl and mix together thoroughly with a whisk or fork. Melt the butter in a small saucepan. Remove the pan from the heat and stir in the brown sugar and peanut butter. Use a wooden spoon or rubber spatula to beat in the egg, vanilla, and half of the peanuts. Stir in the flour mixture until just combined. Do not overmix.

3. Spread the batter evenly in the prepared pan. Sprinkle the remaining nuts and chocolate chips evenly over the top. Bake for 20-25 minutes, or until the nuts have toasted, the top is golden brown, and the edges have pulled away from the sides of the pan. Cool the pan on a rack for 5 minutes, then lift the ends of the foil and allow the blondies to cool completely on the rack. Use a long, sharp knife to cut into squares. The blondies may be stored in an airtight container for 3-4 days.

Cardamom-Almond Pound Cake

2 Oct

IMG_8900

I have never been a picky eater. Even though I ate just about everything as a child, certain foods made more appearances than others. I enjoyed tomato sauce pasta, white rice, and grilled chicken multiple times per week. Sometimes multiple times per day, if my grandmothers were babysitting me.

This same idea applies to dessert. I cannot recall how many chocolate cakes and chocolate chip cookies I have sampled in my lifetime. Too many. Cakes spiced with cardamom? Just one–a buttery Armenian Easter bread that I look forward to every year. Despite my love of this bread, I had never thought of using cardamom in any of my own baked goods. So when I saw this recipe for cardamom-almond pound cake in the August issue of Bon Appétit, I knew I had to try it. Cardamom has an awesome nutty/spicy quality that gives this sturdy pound cake an exotic flavor. My favorite part of any loaf cake is the crunchy top, which, in this case, is studded with golden brown slivered almonds.

Recipe courtesy of Bon Appétit 

  • 3/4 cup (1 1/2 sticks) unsalted butter, room temperature, plus more for pan
  • 1 1/4 tsp. baking powder
  • 1 tsp. ground cardamom
  • 3/4 tsp. kosher salt
  • 1/4 cup whole milk
  • 1/2 cup crème fraîche (I used full-fat sour cream instead)
  • 1 cup sugar
  • 3 large eggs, room temperature
  • 3/4 tsp. vanilla extract
  • 1/4 tsp. almond extract
  • 1/4 cup sliced almonds
  • 2 cups all-purpose flour

1. Position a rack in middle of oven and preheat to 350° F. Butter a 9x5x3” loaf pan; line bottom and long sides with a strip of parchment paper, leaving overhang.

2. Whisk baking powder, cardamom, salt, and 2 cups flour in a medium bowl; set aside. Whisk milk and ½ cup crème fraîche in a small bowl; set aside.

3. Using an electric mixer equipped with a paddle attachment, beat sugar and ¾ cup butter on high speed until light and fluffy–about 4 minutes. Do not rush this step as it gives the cake its light texture. Add eggs one at a time, beating to blend between additions and occasionally scraping down sides and bottom of bowl with a spatula. Then add vanilla and almond extracts.

4. Reduce speed to low and add dry ingredients in 3 additions, alternating with crème fraîche mixture in 2 additions, beginning and ending with dry ingredients; beat just until combined. Do not overmix. Scrape batter into prepared pan, smooth top, and sprinkle with sliced almonds.

5. Bake cake until golden brown and a tester inserted into the center comes out clean, 55–65 minutes. (Tent with foil if browning too quickly.) Transfer pan to a wire rack and let cake cool in pan for 15 minutes. Using parchment overhang, gently remove cake from pan and transfer to rack; let cool completely.