Archive | Nuts RSS feed for this section

Toasted Coconut Muesli

10 Dec

IMG_1614

I can hardly believe that half of my sophomore year is already over. It seems like just yesterday that I was hopping on a plane to New York for my summer internship, and now I am already sending out applications for next summer. It’s been a while since I have contributed to this space, and for good reason. This past semester was filled with exciting new projects and responsibilities, a packed class schedule, and time spent trying to find my niche on campus. I certainly haven’t forgotten about Let’s Live La Vida, but it has taken a back seat in the past few months.

IMG_1618

With any creative endeavor, it is so important to expose yourself to new perspectives and ways of capturing a subject. I have wrestled with DSLR photography for years, vacillating in my approach while never being entirely satisfied with the results.

I recently spent an afternoon with my uncle Avo, an excellent photographer with a very organic style, to observe his approach towards food photography. His creative spontaneity is the perfectly foil to my fastidious and careful manner. I knew working with him would allow me to depart from my perfectionist mentality.

While I have always tried to display food in its simplest form, my uncle showed me how to let the subject speak for itself. Rather than fuss with styling minutia, vibrant color and light are all you need to create a beautiful and intriguing image.

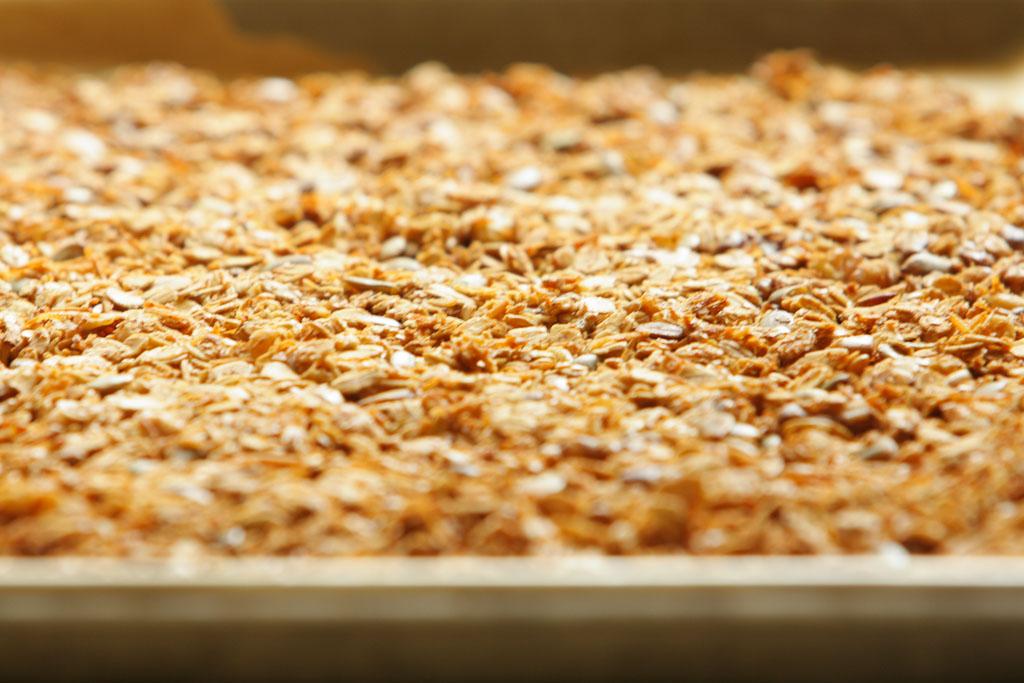
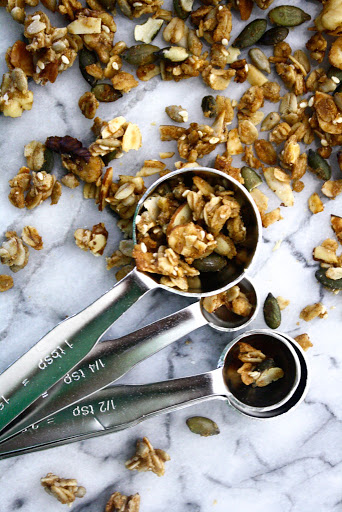
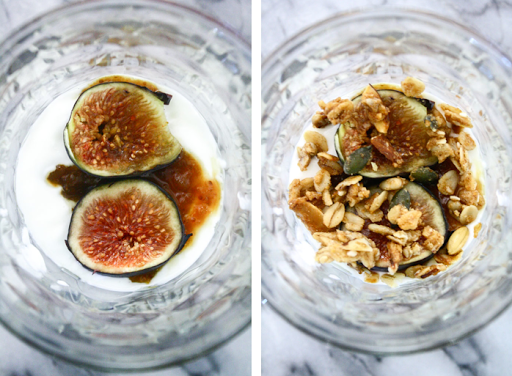
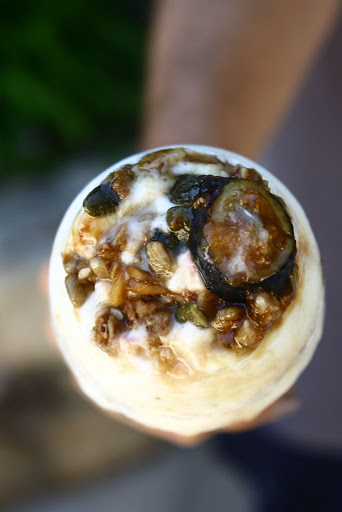
I picked up my camera again this morning and applied some of my newfound skills. Megan Gordon, author of the lovely breakfast cookbook Whole Grain Mornings, introduced me to this recipe for toasted coconut muesli. A lighter, less oily version of granola, muesli has become a staple in my pantry. I love that it is not too sweet, with just the right amount of crunch to liven up a bowl of yogurt.

Recipe barely adapted from Whole Grain Mornings by Megan Gordon

Megan recommends stirring in the dried mango once the muesli has cooled on the baking sheet. To prevent the dried fruit from getting too hard, I like to mix it in separately for each serving. 

  • 2 1/4 cups rolled oats
  • 1/4 cup wheat bran
  • 1/2 cup unsweetened shredded coconut
  • 1/2 cup raw pumpkin seeds
  • 1/2 cup coarsely chopped walnuts
  • 1/4 teaspoon cinnamon
  • 1/4 teaspoon ground cardamom (optional)
  • 1/4 teaspoon salt
  • 2 tablespoons coconut or olive oil
  • 1/4 cup honey
  • 1/2 cup dried mango or other dried fruit of choice (optional)

Yields about 3 cups.

1. Preheat the oven to 325 degrees Fahrenheit. Line a rimmed baking sheet with parchment paper. In a large bowl, toss together the rolled oats, wheat bran, coconut, pumpkin seeds, walnuts, cinnamon, cardamom, and salt.

2. Heat the coconut oil and honey in a small saucepan over low heat until warmed. Pour the mixture over the dry ingredients and stir until everything is evenly coated. Spread evenly across the prepared baking sheet and bake until golden brown, about 20-25 minutes. Remove from the oven and let cool completely on baking sheet. Stir in dried fruit, if using.

Ma’amoul Cookies from my Great Aunt’s Armenian Vegan Cookbook

2 Jun

IMG_0708

While my family has always appreciated good meals, as a child, I seldom spent time in the kitchen. I cultivated my interest in food independently, experimenting with recipes, photographing, and sharing these experiences on my blog. As I grew older, my love of food and my Armenian heritage became defining aspects of my identity. I longed to learn about traditional Armenian cuisine, but did not know where to begin. That was until my great aunt, Dikranouhi Kirazian, released her new cookbook entitled Armenian Vegan. 

IMG_0726

IMG_0722

Armenian Vegan contains more than 200 traditional Armenian recipes, including appetizers, breads, main courses, and desserts, using no animal products. For seven years, my aunt secretly labored over this book with the help of her husband, George. She told no one about the project, leaving my extended family in shock upon receiving copies in the mail.

I relished flipping through the pages, discovering recipes that I had never heard of before along with vegan adaptations of classic dishes. Dikranouhi presents a practical and healthy approach to cooking, with simple instructions and ingredients accessible to novice cooks. She writes thoughtfully, sharing personal anecdotes and the cultural significance behind certain foods.

IMG_0730

While reading the dessert section, these walnut-stuffed cookies caught my eye. Flavored with Mahlab, ground cherry pits, and delicate rose water, Ma’amoul are ubiquitous throughout the Middle East. I substituted a few ingredients based on what I had on hand, replacing Mahlab with ground cardamom and rose water with orange blossom water.

Though somewhat time-consuming to shape, these cookies’ handmade touch contributes to their charm. While nestling the sweet walnut filling inside a pocket of supple dough, I imagined my aunt learning this technique when she was a girl. Feeling a personal connection to a recipe makes eating it so much more fulfilling. Most importantly, however, the flavors here are wonderful. Semolina flour, traditionally used to make pasta, provides a toothsome texture and tender crumb, its robustness offset by a sliver of walnut-cinnamon paste. To finish, an elegant coating of powdered sugar makes these dainty treats ideal for serving alongside a cup of tea.

IMG_0715

Recipe adapted from Armenian Vegan 

These cookies can be adapted using various nuts and spices. Possible combinations include pistachio and rose water or date and orange blossom water. 

For the cookie dough:

  • 2 1/4 cups farina or semolina flour
  • 1 cup all-purpose flour
  • 1/2 cup granulated sugar
  • 1 teaspoon cardamon, preferably freshly ground
  • 1 teaspoon baking powder
  • 1/2 teaspoon baking soda
  • 1/4 teaspoon salt
  • 1 cup melted margarine or butter (for non-vegan option), melted and cooled
  • 1/2 cup soy milk or cow’s milk (for non-vegan)
  • 2-4 tablespoons orange blossom or rose water

For the walnut filling:

  • 1 cup chopped walnuts
  • 1/4 cup granulated sugar
  • 1 1/2 teaspoons cinnamon
  • Pinch of nutmeg
  • Pinch of allspice
  • Powdered sugar for dusting

Yields about two dozen cookies.

1. In a large bowl, sift the flour, baking powder, and baking soda. Add the farina or semolina flour, sugar, salt, and ground cardamom and mix thoroughly with a whisk or fork. Mix in melted margarine or butter with a spoon. Bring milk to a boil, add to the flour mixture, and mix well. Knead the dough with your hands until it reaches a smooth pasty consistency, about 1 minute. Add the orange blossom or rose water, knead a few more times to combine. Cover the bowl with plastic wrap and allow the dough to rest at room temperature for 2-3 hours.

2. Meanwhile, make walnut filling. Place walnuts, sugar, cinnamon, nutmeg, and allspice into a small food processor. Process on high speed until the mixture reaches a moist, pasty consistency, about 1 minute.

3. Preheat the oven to 350 degrees F. Place racks in the lower and upper thirds of the oven. When the dough is ready, measure out tablespoons of dough. Roll each piece into a ball and make an indent in the center, creating a little cup. Place 3/4 teaspoon of walnut paste into the cup, flatten it, then place another flattened ball of dough on top. Seal the seams tightly but carefully with you fingers. Repeat with remaining dough. If you own a Ma’amoul mold, you may use it instead.

4. Place stuffed cookies an inch apart on a baking sheet lined with parchment paper. Bake for 10 minutes on the lower level of the oven, then transfer them to the top shelf for an additional 3-5 minutes, until lightly golden brown. Transfer the parchment onto a cooling rack, and allow the cookies to cool completely. Once cool, dust cookies with powdered sugar.

Peanut Butter Blondies

3 Jan

At the beginning of January, most food blogs share healthy recipes to help you recover from holiday indulgences and commit to your New Year’s resolutions. Even though I am all about kale salad right now (because it tastes delicious), maintaining a truly healthy diet requires balance. An article I read in the New York Times re-affirmed this belief. I love to bake and consume sweets almost every day, but in moderation, which is key. If my diet centers around fresh produce, whole grains, and lean meats, there is nothing wrong with enjoying quality, homemade baked goods. Which leads me to these peanut butter blondies.

Peanut butter is a quintessential American food. However, despite its ubiquity, most people either love it or they hate it. My dad was of the latter camp, and for years, I tried in vain to convert him. I slathered peanut butter on brioche toast, sandwiched it between shortbread, and even sacrificed some of my beloved Girl Scout cookies to the cause. These magical little bars finally inspired him to see the light.

The blondies have an undeniable peanut flavor without being too rich or overpowering. The saltiness of the roasted peanuts contrasts perfectly with the sweetness of the chocolate chunks, and best of all, the batter takes minutes to mix up in a saucepan. My dad ate two in a matter of minutes, and was disappointed when they were all gone. So, what are you waiting for? It’s 2014. Let’s celebrate with some peanut butter blondies.

Recipe courtesy of Chewy Gooey Crispy Crunchy by Alice Medrich

  • 1 cup all-purpose flour
  • 1/2 tsp baking powder
  • 1/4 tsp salt
  • 8 tblsp (1 stick) unsalted butter
  • 2/3 cup packed light brown sugar
  • 1/3 cup well-stirred natural, salted peanut butter (smooth)
  • 1 large egg
  • 1/2 tsp pure vanilla extract
  • 1/2 cup roasted peanuts
  • 1/2 cup (3 oz) semisweet chocolate chips or chunks

Yields 16 blondies.

1. Line the bottom and all four sides of an 8-inch square pan with foil. Position a rack in the lower third of the oven and preheat to 350° F.

2. Combine the flour, baking powder, and salt in a small bowl and mix together thoroughly with a whisk or fork. Melt the butter in a small saucepan. Remove the pan from the heat and stir in the brown sugar and peanut butter. Use a wooden spoon or rubber spatula to beat in the egg, vanilla, and half of the peanuts. Stir in the flour mixture until just combined. Do not overmix.

3. Spread the batter evenly in the prepared pan. Sprinkle the remaining nuts and chocolate chips evenly over the top. Bake for 20-25 minutes, or until the nuts have toasted, the top is golden brown, and the edges have pulled away from the sides of the pan. Cool the pan on a rack for 5 minutes, then lift the ends of the foil and allow the blondies to cool completely on the rack. Use a long, sharp knife to cut into squares. The blondies may be stored in an airtight container for 3-4 days.

Orange-Walnut Twists and Vintage Finds

1 Nov

IMG_9226

As much as I love the smell of new shoes or the crackly sound pages make when you open a new book, older items have their unique charm. At vintage stores and flea markets, discovering a hidden gem among a pile of junk makes your purchase very memorable.

While strolling down Glendale Boulevard over the summer, I stumbled upon an used bookstore called Alias Books. Being a newspaper/magazine/literature-enthusiast, I could have spent hours perusing the shelves. Since I was on a time constraint, I headed straight to the most important section–cookbooks. When I spotted a 1959 edition of Pillsbury’s Best 1000 Recipes: Best of the Bake-Off Collection, I knew I had to have it.

Screen Shot 2013-10-25 at 7.23.34 PM

The first Pillsbury Bake-Off took place in 1949, when more than 4,000 finalists competed for a $50,000 grand prize. This book contains 1000 winning recipes from the 1959 event, organized by category: quick breads and muffins, yeasted doughs, cakes, and many more. Each recipe includes the name and hometown of the woman who created it, a special detail that gives the baked goods a sense of homeyness and personal touch. I initially bought the book because of the history behind it rather than for practical use, but it’s since become one of my go-to sources for delicious, retro treats.

For these orange-walnut twists, I worked with a yeasted pastry dough for the first time. Though the process was a bit labor intensive, I was thrilled with the flavor and gorgeous, golden appearance of the final product. I followed the recipe exactly, but added chopped golden raisins to the filling for an extra burst of sweetness. I recommend eating these twists on the day-of, ideally while they’re still warm out of the oven.

image

An image from the 1959 Pillsbury Bake-Off.

Recipe courtesy of Pillsbury’s Best 1000 Recipes: Best of the Bake-Off Collection.

By Mrs. Bertha E. Jorgensen, Portland, Oregon

  • 2 packets active dry yeast
  • 1/3 cup unsalted butter
  • 3/4 cup hot, scalded milk
  • 1/3 cup granulated sugar
  • 2 tsp. Kosher salt
  • 2 tsp fresh orange zest
  • 2 large eggs
  • 4 to 41/2 cups all-purpose flour, sifted

For the filling:

  • 1/3 cup unsalted butter, softened
  • 1 cup powdered sugar, sifted
  • 1 cup finely chopped walnuts or other nuts you prefer
  • 1/4 cup finely chopped golden raisins

For the glaze:

  • 1/4 cup freshly squeezed orange juice
  • 3 tblsp. granulated sugar

Yields 18-24 twists.

1. Soften the yeast in 1/4 cup warm water. Meanwhile, add 1/3 cup butter to the hot, scalded milk in a medium saucepan. Once the butter has melted, allow the mixture to cool to lukewarm.

2. In a large mixing bowl equipped with a paddle attachment, combine sugar, salt, orange zest, eggs, and softened yeast. In increments of 1 cup, gradually add the flour until a stiff (but not dry) dough forms, beating after each addition. I used about 4 1/4 cups. Cover the bowl with a damp towel and let stand 30 minutes.

3. While the dough is resting, prepare the nut filling. Using a hand mixer or a spoon, cream the butter until light and airy. Blend in the powdered sugar and then add the nuts and raisins.

4. Roll out the rested dough into a 22 x 12 inch rectangle on a lightly floured working surface. Spread the nut filling evenly on the 22-inch side. Fold the uncovered side over the side with the filling. Cut the dough into 1-inch strips (crosswise). Twist each strip 4 or 5 times. Hold one end of the twist onto a greased, unlined baking sheet, then curl the remaining strip around the center to form a pinwheel. (See above for step-by-step photos).

5. Cover the shaped twists with a damp towel and let them rise in a warm place (85° F) until light and doubled, 45 to 60 minutes. Preheat the oven to 375° F and bake the twists for 15 minutes. Meanwhile, prepare the glaze by cooking orange juice and sugar over medium heat until the sugar dissolves and the mixture is slightly bubbling. Brush tops of rolls with glaze and bake for 5 more minutes. Remove from the oven and transfer the twists immediately to a cooling rack.

Easy Yogurt Popsicles and Preparing for College Life

17 Aug
Dorm food has a bad reputation. Pizza, chips and candy, energy drinks, and Cup Noodles constitute the four major food groups of the college diet. So how does a teen food blogger, one who considers the Saturday morning farmers’ market the highlight of her week, navigate this daunting new environment?  
Well, for starters, I will live in an apartment-style dorm this fall. My two roommates and I share a kitchenette equipped with a refrigerator, stove, and (hopefully) a small oven. I have access to fresh produce and pantry staples from an on-campus grocery store, but everything I cook must be quick and simple. Healthy snacks are especially important because they keep me going throughout the day and dictate my energy level. 
 
Enter yogurt popsicles with granola and fresh figs. 
This recipe allows you to use whatever you have on hand, mixing and matching flavors, with no fancy equipment required. Layer granola, mixed nuts, and ripe fruit with dollops of yogurt in a glass vessel, pop the glass in the freezer for a few hours, and enjoy a specially-designed, portable snack.
 
Some of my favorite combinations include toasted coconut and blueberries, almond butter and banana, and mixed berries with jam.
In the coming weeks, I will chronicle every chapter of my dorm food adventure. I invite you all to share any recipes and tips with me in the comments box. I look forward to discovering creative ways to enjoy fresh food within the parameters of college life.
 
Ingredients 
1/2 cup yogurt (I like the tanginess of Greek yogurt)
3 tblsp granola 
2 ripe figs 
2 tblsp fig jam 
Drizzle of honey 
 
Drizzle the sides of the glass with honey. Cover the bottom with a dab of yogurt. Layer bits of jam, figs and granola with the yogurt, sealing the top with yogurt. Stick a spoon through the center of the “parfait,” and freeze for at least five hours. To release the popsicle, run the glass under warm water and twist the spoon.