Archive | Dessert RSS feed for this section

Citrus-Almond Biscotti

6 Aug

Recipe adapted from William Sonoma’s The Art of the Cookie

Ingredients
2 large eggs plus 1 large egg white
2 cups all-purpose flour
1 teaspoon baking powder
1/4 teaspoon salt
4 tablespoons unsalted butter, at room temperature
3/4 cup granulated sugar
1 teaspoon almond extract
1/2 teaspoon vanilla extract
1/2 cup unsalted, slivered almonds
The zest of 1 orange


1. Preheat the oven to 350 degrees. Line a baking sheet with parchment paper. In a small bowl, whisk together the egg white with 1 teaspoon water; set aside.
2. In a medium bowl, whisk together the flour, baking powder, and salt. In a large bowl, using an electric mixer fitted with a paddle attachment on medium-high speed, beat the butter and granulated sugar until light and fluffy. Add the 2 eggs and almond and vanilla extracts and beat on low speed until the eggs are incorporated. Beating on low speed, slowly add the flour mixture and continue to beat until fully incorporated. Add the almonds and the orange zest until just distributed.
3. Divide the dough in half. Shape each piece into a 4 1/2-by-7-inch log and transfer the logs to the prepared baking sheet, spacing them 4 inches apart. Brush the tops of the logs with the egg white mixture and lightly sprinkle them with granulated sugar.
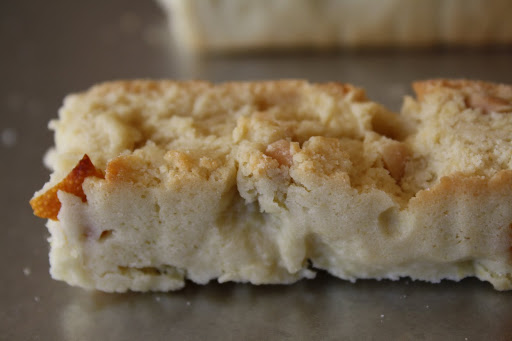
4. Bake until the tops of the logs are light brown, 18-20 minutes. Remove the cookies and leave the oven on. Using a serrated knife, cut each log into 10 slices about 3/4 of an inch thick. Arrange the slices, cut side down, on the sheet and bake until the biscotti are golden brown, 10 minutes. Using a spatula, transfer the biscotti to a wire rack and let cool completely.


Biscotti have never been my favorite cookie. Always rock-hard and stale, I have had several unpleasant experiences with biscotti in the past. This recipe altered my negative perception of the traditional Italian cookie. The savory almond contrasts perfectly with the tangy orange zest, creating an ideal consistency and flavor balance. Unlike the others I had tried, these citrus-almond biscotti are beautifully crisp and golden brown on the tops and barely moist on the insides. You can substitute the almond and citrus for various fruits, nuts, and chocolates based on personal preference or seasonal availability of products. If you are impartial to biscotti because of a sour past experience, I strongly encourage you to try this recipe. I can assure that you will not be disappointed.

Double Chocolate Bliss

7 Jul

Recipe adapted from Bon Appetit


Ingredients
4 ounces semi-sweet chocolate, chopped
1 3/4 cups all-purpose flour
1/4 cup unsweetened cocoa powder
1 teaspoon baking powder
3/4 teaspoon baking soda
1/2 teaspoon salt
1 3/4 cups sugar
1/2 cup unsalted butter, room temperature
2 teaspoons vanilla extract
2 large eggs
1 1/2 cups whole milk


For the filling and frosting:
3 cups chilled heavy whipping cream
1/4 cup unsalted butter, cut into pieces
1 pound white chocolate, chopped
2 teaspoons vanilla extract
1/2 teaspoon almond extract


Serves 12-14 slices.


1. Preheat the oven to 350 degrees. Butter two 8-inch-diameter cake pans with 2-inch-high sides. Line the bottoms with parchment paper and butter the parchment. 
2. Stir the semi-sweet chocolate in a medium saucepan over low heat until melted and smooth. Cool slightly. Sift the flour, cocoa powder, baking powder, baking soda, and salt into a medium bowl. 
3. Using an electric mixer equipped with a paddle attachment, beat the sugar and butter in a large bowl until well blended. Beat in the lukewarm, melted chocolate and vanilla. Beat in the eggs, one at a time, blending well after each addition. Add in the cocoa powder mixture in three additions, alternating with milk in two additions.
4. Divide the batter equally between prepared pans. Bake the cakes until a tester inserted into the center comes out clean, about 45 minutes. Make sure not to overcook the cakes, they should be soft and airy after 45 minutes. Cool the cakes in pans on drying racks for 10 minutes. Run a knife around the edge of each pan to loosen the cakes. Cool the cakes completely on the racks. Peel off the parchment paper.
5. Bring one cup cream and butter to simmer in a medium saucepan over medium heat, stirring until the butter melts. Once the butter has completely melted, add the white chocolate and the vanilla and stir until smooth. Pour 1 1/2 cups of the white chocolate filling into a small bowl; cover and freeze until cold, about two hours.

6. Let the remaining white chocolate mixture stand at room temperature until lukewarm, about 20 minutes. Using an electric mixer, beat the remaining two cups cream and almond extract in a large bowl until peaks form. Working in three batches, fold in the lukewarm white chocolate mixture. Refrigerate the whipped cream frosting just until medium peaks hold, folding occasionally, about three hours.
7. To frost, place one cake layer on a platter. Spread the chilled 1 1/2 cups of white chocolate filling over the layer. Top with the second cake layer. Spread whipped cream frosting over the top and sides of the cake. Chill until cold and set, about one hour. 

          For a Fourth of July family barbecue, my sister and I embarked on an highly-anticipated baking adventure: the making of our very first cake. We searched the internet and flipped through pages of several cookbooks before ultimately deciding upon this recipe from Bon Appetit. We slaved over each component of the dessert; a process that started in the morning progressed late into the afternoon. When I finally took my first bite of the cake, the hours of labor all paid off. 
          I savored the dessert slowly, in disbelief that such a creation had come from my own kitchen. Two layers of perfectly moist chocolate cake, separated by a sliver of white chocolate ganache, and slathered with the fluffiest, cloud-like white chocolate frosting you will ever taste: a chocolate-lover’s dream. You are missing out on dessert heaven if you have not tried this cake. The recipe requires multiple steps but each and every one is completely worth it. Do not be intimidated by the involved process because, while somewhat lengthy, it is difficult to mess up. Even for a first-timer such as myself, this cake fell nothing short of flawless.

Banana Cupcakes

23 Jun


Ingredients
1 1/2 cups all-purpose flour
3/4 cup sugar
1 teaspoon baking powder
1/2 teaspoon baking soda
1/4 teaspoon salt
1/4 teaspoon ground cinnamon
1 stick unsalted butter (melted)
1 1/2 cups mashed bananas (4 ripe bananas)
2 eggs 
1 teaspoon vanilla extract


For the frosting:
1 cup unsalted butter, room temperature, cut into small pieces
1 3/4 cups confectioners’ sugar
Pinch of salt
1 vanilla bean, scraped
1/2 teaspoon vanilla extract
1/8 cup milk


Makes 12 cupcakes.


1. Preheat the oven to 350 degrees. Line a 12-cup muffin pan with paper liners.
2. In a medium bowl, whisk together the flour, sugar, baking powder, baking soda, salt, and cinnamon.
3. Make a small well in the center of the flour mixture. In the well, mix together the mashed bananas, butter, eggs, and vanilla. Stir to incorporate the entire mixture; do not over mix. Evenly distribute the batter into the muffin cups. Bake until a toothpick inserted in the center of the cupcake comes out clean, for 25 to 30 minutes. Allow the cupcakes to cool completely before frosting.
4. For the frosting, in a bowl of an electric mixer fitted with a paddle attachment, beat the butter until creamy. Slowly add the confectioners’ sugar, beating to combine.
5. Add the vanilla bean seeds and vanilla extract and beat to combine. Slowly add milk and continue beating on medium-low speed until smooth and creamy, about five minutes.
6. Frost the cupcakes using a piping bag and garnish with a fresh banana slice. 


Moist, tender, and topped with airy vanilla bean frosting, bananas have never tasted so good. This heavenly cupcake recipe serves as a definite crowd-pleaser. The batter provides a flavorful base for all things banana, from breads to muffins. Enjoy whichever rendition you choose!

Nutella Thumbprint Cookies

19 Jun

Ingredients
6 tablespoons butter
1/4 cup confectioners sugar
1/8 teaspoon salt 
1/2 teaspoon vanilla extract 
1/2+1/8 cups all-purpose flour 


For the nutella filling:
1/2 cup nutella 
1 tablespoon milk 
1 tablespoon butter 


Makes 12 cookies.


1. Preheat the oven to 350 degrees. 
2. In an electric mixer fitted with a paddle attachment, beat together  butter, sugar, salt, and vanilla on medium-high speed until smooth, about two minutes. Beat in flour gradually, beginning on low speed and increasing to medium high.
3. Roll dough by teaspoonfuls into balls and place on an un-greased baking sheet one inch apart. 
4. Bake for 10 minutes, remove from oven, and make indentations using thumbs (if the dough is too hot to handle, use a teaspoon measure or watermelon baller for the same effect). Return to oven and bake for an additional seven to nine minutes.
5. Remove the cookies from the oven and allow them to cool completely before adding the nutella filling. 
6. For the filling, combine nutella and butter in a small, heat-proof bowl. Set the bowl over a pot of simmering water and stir until smooth. Add the milk and stir the mixture until completely combined. 
7. Spoon the filling into the cookies using a teaspoon measure. Cool the cookies in the refrigerator for 20 minutes until the nutella filling is firm. 


These delicious, nutella-filled thumbprint cookies spice up your standard snack break. Dip in coffee for added flavor or pop one in your mouth for sweet satisfaction. I love the contrast between the buttery crunch and silky, chocolate-hazelut filling. An easy and efficient recipe, impress your party guests with this tasty dessert. Happy baking!

Authentic Strawberry Shortcakes

2 Apr

Ingredients
1/4 cup sugar 
2 cups all-purpose flour 
1 tablespoon baking powder 
6 tablespoons cold butter, cut into small pieces  
1 large egg 
1/2 cup and 2 tablespoons heavy whipping cream 
1/2 teaspoon vanilla extract 


For the compote:
2 1/2 cups hulled and halved strawberries 
2 1/2 tablespoons water 
1 1/4 tablespoons sugar 


Makes 10 shortcakes. 


1. Preheat the oven to 375 degrees. Line two baking sheets with parchment paper. 
2. Combine the sugar, flour, and baking powder in a large bowl. Using a fork, cut in the butter until the dough resembles coarse meal. 
3. Whisk together the egg and the whipping cream in a small bowl. Slowly add this mixture to the dry ingredients until the dough comes together. 
4. Transfer the dough to a lightly-floured surface, patting it down to a 1-inch-thick square. Use a 2 1/2 inch cookie cutter to cut the dough into circles. Repeat the process until you have used up all the dough. 
5. Bake until golden brown for 25-30 minutes. Allow to cool for 15 minutes. 
6. For the compote, combine the strawberries, sugar, and water in a small saucepan. Simmer until the strawberries become soft, having released their juices. 
7. To serve, cut the shortcakes length-wise. Place a scoop of vanilla ice cream in the center of the shortcake and drizzle the compote over the ice cream. Top with a few fresh strawberry slices. 


These classic strawberry shortcakes were fun and easy to bake. There is nothing more satisfying than watching the dainty circles of dough puff up into beautiful golden biscuits in the oven. The shortcakes are buttery and flaky on the outside and tear open seamlessly, revealing a soft and airy interior. While vanilla ice cream is decadent and refreshing, freshly whipped cream would work beautifully here as well. The biscuits are also wonderful for breakfast or afternoon tea time, slathered with butter and your favorite fruit preserve.

Design a site like this with WordPress.com
Get started