Archive | Breakfast RSS feed for this section

My Favorite Banana Bread

25 Feb

When I first began baking, I insisted that everything I made was absolutely delicious. I fiercely defended my rock-hard pound cakes, puddle-shaped sugar cookies, and acridly-sweet brownies. Over time, I learned that one must accept failure in order to develop outstanding recipes. Few baked goods come out perfect after the first try, and even then, an experienced baker will elevate them from great to excellent. My tireless pursuit of the perfect banana bread taught me this invaluable lesson.

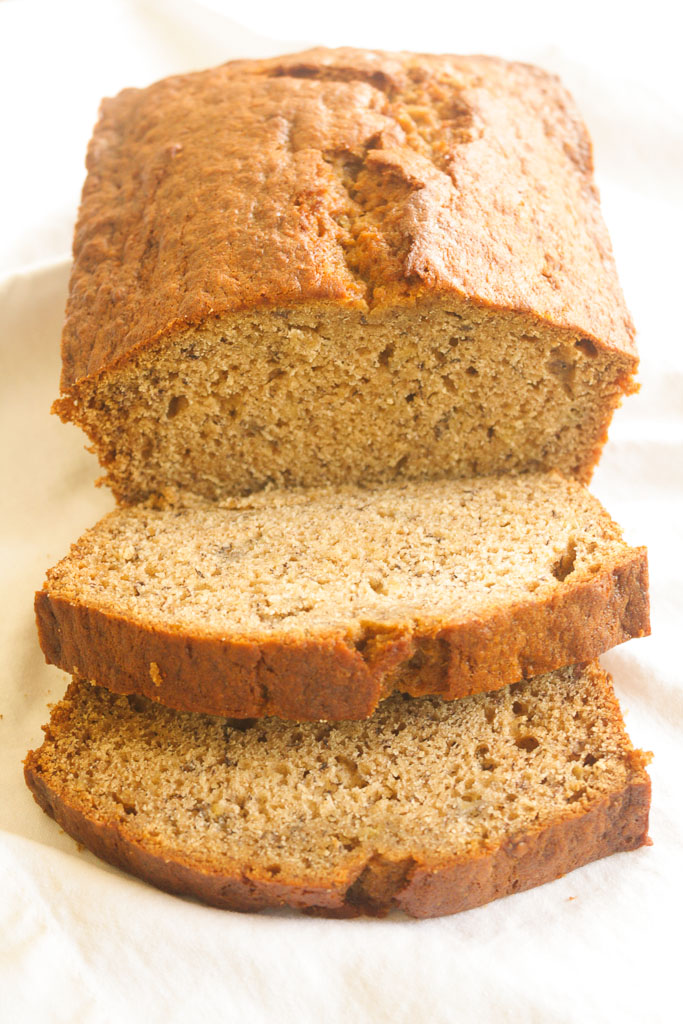
When it comes to classic American treats, everyone has different preferences. Through sampling countless banana breads, from bakeries and my own kitchen, I formulated an ideal version in my mind. A moist, fragrant loaf with a tender crumb and cake-like consistency, this recipe achieved my goal.

This bread appeals to banana purists. Beating the butter and brown sugar creates a light, fluffy texture and a nice lift to the crust. This technique yields an end product closer to a tea cake than a spongy, dense quick bread. Even though it’s wonderful plain, sliced thick and smeared with a dab of butter, I can’t wait to spice it up with chocolate chunks, nuts, and coconut flakes. Because even my perfect recipe offers infinite opportunities for improvement.

Recipe adapted from Donna Hay Magazine via Sweetie’s Home

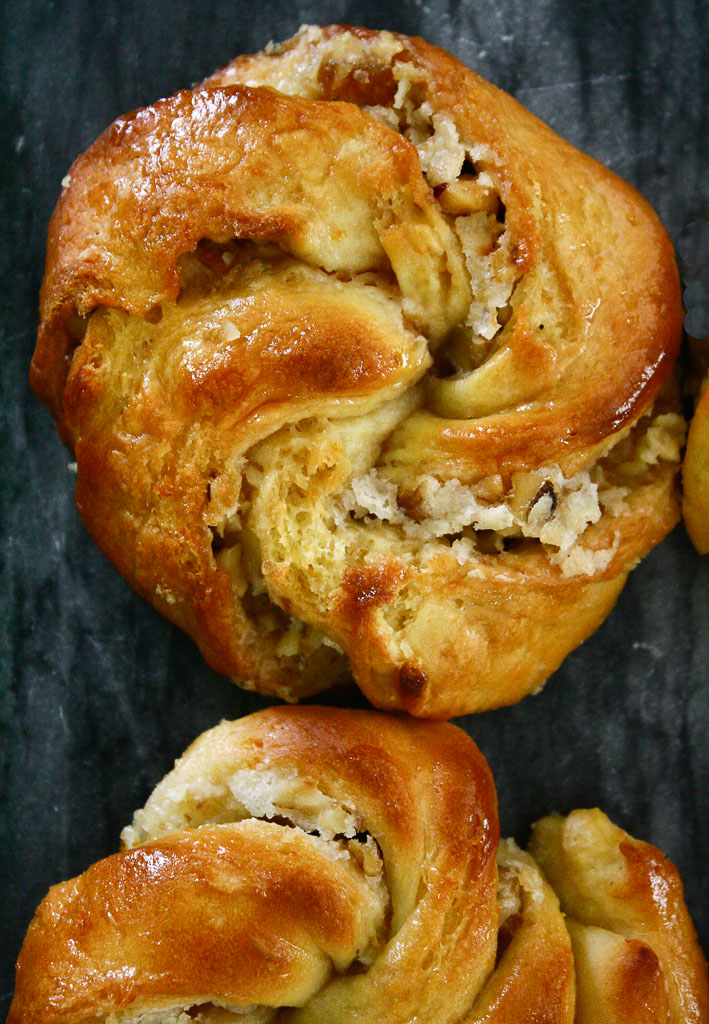
Adding a handful of walnuts provides a pleasant crunch and toasty flavor.

  • 8 tblsp (1 stick) of unsalted butter, at room temperature
  • 3/4 cup brown sugar
  • 1/4 cup honey
  • 1 tsp vanilla extract
  • 2 eggs, at room temperature
  • 2 cups of mashed, ripe bananas (about 4 large bananas)
  • 2 cups all-purpose flour
  • 1 tsp baking powder
  • 1 tsp baking soda
  • 1 tsp ground cinnamon
  • 1/2 tsp fine sea salt
  • 1/2 cup toasted, chopped walnuts (optional)

1. Preheat the oven to 350° F. Grease a 9×5-inch loaf pan with butter. Using a stand mixer equipped with a paddle attachment, beat the butter and brown sugar on medium-high speed until light and fluffy, about 3-5 minutes. Add the honey and beat for another minute, or until thoroughly combined. Reduce the mixer to medium speed, and add the eggs one at a time. Add the vanilla extract and banana and mix until thoroughly combined, scraping down the sides of the bowl when necessary.

2. In a medium bowl, whisk together the flour, baking powder, baking soda, cinnamon, salt, and walnuts. On low speed, add the dry ingredients to the wet ingredients, mixing until just barely combined. A few streaks of flour are OK.

3. Pour the batter into the prepared pan and spread evenly. Bake for 55-65 minutes, or until a toothpick inserted into the center of the bread comes out with moist crumbs attached. Cool in pan on a cooling rack for 10 minutes, then remove the bread and allow it to cool completely.

Lemon-Rosemary Scones with Golden Raisins

8 Jan

When I joined my high school student newspaper staff, I learned about the concept of evergreen articles. In journalism, the term “evergreen” describes stories that remain relevant over long periods. I think this same concept can be applied to baking. No matter what ingredients are popular at the moment, people will always be on the lookout for certain basic recipes.

Brownies, chocolate chip cookies, and blueberry muffins are classics that every home baker should have in his or her arsenal. Cream scones also belong in this category of essential baked goods–buttery morsels with slightly crunchy tops and fluffy, tender interiors. Despite this pastry’s seeming simplicity, all the renditions I tried came up short from the light-as-air scone of my dreams. So I turned to Baking Illustrated, a source known for extensive testing and detailed instructions, and finally found what I was searching for.

These cream scones provide an ideal base for all sorts of add-ins. The rosemary’s herbaceous flavor offsets the pastry’s richness and contrasts well with the tangy lemon zest and plump, sweet golden raisins. To achieve flaky, buttery layers, it is key to handle the dough minimally and efficiently. Use a food processor to prevent the dough from overheating, and cut the scones with a sharp knife to ensure maximum lift. And there you have it! An endlessly adaptable cream scone recipe that will never go out of style.

Look at those flaky layers

Basic cream scone recipe courtesy of Baking Illustrated

  • 2 cups all-purpose flour, preferably a low-protein brand such as Gold Medal or Pillsbury
  • 1 tblsp baking powder
  • 2 tblsp sugar
  • 1/2 tsp salt
  • 5 tblsp cold unsalted butter, cut into chunks
  • 1/2 cup golden raisins (or other dried fruit of choice)
  • 1 cup cold heavy cream
  • 1 tblsp freshly grated lemon zest
  • 1 tblsp finely diced fresh rosemary

Yields 8 scones.

1. Adjust the oven rack to the middle position and preheat to 425° F. Mix the lemon zest and rosemary into the cream, and allow it to steep in the refrigerator for 10-15 minutes.

2. Whisk the flour, baking powder, sugar, and salt together in a large bowl. Place this mixture into the workbowl of a food processor equipped with a metal blade. Scatter the chunks of butter evenly over the dry ingredients. Cover and process with 10 one-second pulses, or until the dough resembles coarse pebbles.

3. Remove the blade and transfer the mixture back into the separate bowl. Gently stir in the cream with a fork or rubber spatula until the dough begins to form, about 30 seconds. Transfer the dough and loose flour bits to a clean work surface and knead the dough until it comes together into a rough, slightly sticky ball, 5 to 10 seconds.

4. Gently press the dough into an 8-inch round cake pan, release the round, and cut it into 8 wedges using a very sharp chef’s knife or bench scraper. Place the wedges 1/2 an inch apart on an ungreased baking sheet. Bake until the scone tops are lightly brown, 12-15 minutes. Cool on a wire rack for at least 10 minutes. Serve warm or at room temperature.

Sqirl

13 Dec

Sqirl, a tiny café located in the Virgil Village neighborhood of Los Angeles, has single-handedly fostered my passion for breakfast. Sqirl started as an artisanal jam company, using rare, local produce to create unique flavorings. Think Cranberry-Bourbon and Santa Rosa Plums with Flowering Thyme. Owner Jessica Koslow has applied this same vibrance and ingenuity to her breakfast and lunch café. I mean, just look at the spread. Every dish is colorful and interesting, combining flavors and textures in ways that speak to your pallet.

Brown rice bowl with sorrel pesto, poached egg, and crumbled feta.

Since discovering Sqirl over the summer, I visit on a weekly basis, indulging in rice bowls topped with delicately poached eggs, small-batch baked goods, masterfully-crafted coffees, and brioche toasts. Located off the beaten path, the café offers an intimate and cozy vibe, with eclectic background music and casual bar seating. Despite the decidedly unpretentious setting, Sqirl’s staff is serious about food and crafts each dish with impeccable attention to detail.

Brown butter blondie with raspberry and Tahitian vanilla bean jam.

The brioche toasts anchor the menu and showcases Sqirl’s wonderful jam. Being a nut butter enthusiast, I love the gritty almond-hazelnut butter slathered on top of a thick slice of brioche, and sealed with a layer of glossy peach jam. You can swap out the nut butter for house-made ricotta or rich chocolate ganache sprinkled with fleur de sel. While you may be tempted to raise your eyebrows at the heaping amount of marmalade, fear not. Unlike the cloying, overly-sweetened varieties available at grocery stores, these jams render flavor and freshness, with pieces of whole fruit still intact.

IMG_8728

If that isn’t enough to convince you to visit, the coffee is excellent. Since developing a taste for lattes a few months ago, I crave them on a daily basis. Sqirl not only serves a delightfully creamy latte, but a killer cappuccino with house-made almond milk.

IMG_8735

Sqirl
720 North Virgil Ave.
Ste. 4
Los Angeles, CA 90029
(323) 284-8147
sqirlla.com
– – – – – – – – – – – – – – – – –
Monday – Friday, 6:30 a.m. – 4 p.m.
Saturday – Sunday, 8 a.m. – 4 p.m.

Orange-Walnut Twists and Vintage Finds

1 Nov

IMG_9226

As much as I love the smell of new shoes or the crackly sound pages make when you open a new book, older items have their unique charm. At vintage stores and flea markets, discovering a hidden gem among a pile of junk makes your purchase very memorable.

While strolling down Glendale Boulevard over the summer, I stumbled upon an used bookstore called Alias Books. Being a newspaper/magazine/literature-enthusiast, I could have spent hours perusing the shelves. Since I was on a time constraint, I headed straight to the most important section–cookbooks. When I spotted a 1959 edition of Pillsbury’s Best 1000 Recipes: Best of the Bake-Off Collection, I knew I had to have it.

Screen Shot 2013-10-25 at 7.23.34 PM

The first Pillsbury Bake-Off took place in 1949, when more than 4,000 finalists competed for a $50,000 grand prize. This book contains 1000 winning recipes from the 1959 event, organized by category: quick breads and muffins, yeasted doughs, cakes, and many more. Each recipe includes the name and hometown of the woman who created it, a special detail that gives the baked goods a sense of homeyness and personal touch. I initially bought the book because of the history behind it rather than for practical use, but it’s since become one of my go-to sources for delicious, retro treats.

For these orange-walnut twists, I worked with a yeasted pastry dough for the first time. Though the process was a bit labor intensive, I was thrilled with the flavor and gorgeous, golden appearance of the final product. I followed the recipe exactly, but added chopped golden raisins to the filling for an extra burst of sweetness. I recommend eating these twists on the day-of, ideally while they’re still warm out of the oven.

image

An image from the 1959 Pillsbury Bake-Off.

Recipe courtesy of Pillsbury’s Best 1000 Recipes: Best of the Bake-Off Collection.

By Mrs. Bertha E. Jorgensen, Portland, Oregon

  • 2 packets active dry yeast
  • 1/3 cup unsalted butter
  • 3/4 cup hot, scalded milk
  • 1/3 cup granulated sugar
  • 2 tsp. Kosher salt
  • 2 tsp fresh orange zest
  • 2 large eggs
  • 4 to 41/2 cups all-purpose flour, sifted

For the filling:

  • 1/3 cup unsalted butter, softened
  • 1 cup powdered sugar, sifted
  • 1 cup finely chopped walnuts or other nuts you prefer
  • 1/4 cup finely chopped golden raisins

For the glaze:

  • 1/4 cup freshly squeezed orange juice
  • 3 tblsp. granulated sugar

Yields 18-24 twists.

1. Soften the yeast in 1/4 cup warm water. Meanwhile, add 1/3 cup butter to the hot, scalded milk in a medium saucepan. Once the butter has melted, allow the mixture to cool to lukewarm.

2. In a large mixing bowl equipped with a paddle attachment, combine sugar, salt, orange zest, eggs, and softened yeast. In increments of 1 cup, gradually add the flour until a stiff (but not dry) dough forms, beating after each addition. I used about 4 1/4 cups. Cover the bowl with a damp towel and let stand 30 minutes.

3. While the dough is resting, prepare the nut filling. Using a hand mixer or a spoon, cream the butter until light and airy. Blend in the powdered sugar and then add the nuts and raisins.

4. Roll out the rested dough into a 22 x 12 inch rectangle on a lightly floured working surface. Spread the nut filling evenly on the 22-inch side. Fold the uncovered side over the side with the filling. Cut the dough into 1-inch strips (crosswise). Twist each strip 4 or 5 times. Hold one end of the twist onto a greased, unlined baking sheet, then curl the remaining strip around the center to form a pinwheel. (See above for step-by-step photos).

5. Cover the shaped twists with a damp towel and let them rise in a warm place (85° F) until light and doubled, 45 to 60 minutes. Preheat the oven to 375° F and bake the twists for 15 minutes. Meanwhile, prepare the glaze by cooking orange juice and sugar over medium heat until the sugar dissolves and the mixture is slightly bubbling. Brush tops of rolls with glaze and bake for 5 more minutes. Remove from the oven and transfer the twists immediately to a cooling rack.

Cardamom-Almond Pound Cake

2 Oct

IMG_8900

I have never been a picky eater. Even though I ate just about everything as a child, certain foods made more appearances than others. I enjoyed tomato sauce pasta, white rice, and grilled chicken multiple times per week. Sometimes multiple times per day, if my grandmothers were babysitting me.

This same idea applies to dessert. I cannot recall how many chocolate cakes and chocolate chip cookies I have sampled in my lifetime. Too many. Cakes spiced with cardamom? Just one–a buttery Armenian Easter bread that I look forward to every year. Despite my love of this bread, I had never thought of using cardamom in any of my own baked goods. So when I saw this recipe for cardamom-almond pound cake in the August issue of Bon Appétit, I knew I had to try it. Cardamom has an awesome nutty/spicy quality that gives this sturdy pound cake an exotic flavor. My favorite part of any loaf cake is the crunchy top, which, in this case, is studded with golden brown slivered almonds.

Recipe courtesy of Bon Appétit 

  • 3/4 cup (1 1/2 sticks) unsalted butter, room temperature, plus more for pan
  • 1 1/4 tsp. baking powder
  • 1 tsp. ground cardamom
  • 3/4 tsp. kosher salt
  • 1/4 cup whole milk
  • 1/2 cup crème fraîche (I used full-fat sour cream instead)
  • 1 cup sugar
  • 3 large eggs, room temperature
  • 3/4 tsp. vanilla extract
  • 1/4 tsp. almond extract
  • 1/4 cup sliced almonds
  • 2 cups all-purpose flour

1. Position a rack in middle of oven and preheat to 350° F. Butter a 9x5x3” loaf pan; line bottom and long sides with a strip of parchment paper, leaving overhang.

2. Whisk baking powder, cardamom, salt, and 2 cups flour in a medium bowl; set aside. Whisk milk and ½ cup crème fraîche in a small bowl; set aside.

3. Using an electric mixer equipped with a paddle attachment, beat sugar and ¾ cup butter on high speed until light and fluffy–about 4 minutes. Do not rush this step as it gives the cake its light texture. Add eggs one at a time, beating to blend between additions and occasionally scraping down sides and bottom of bowl with a spatula. Then add vanilla and almond extracts.

4. Reduce speed to low and add dry ingredients in 3 additions, alternating with crème fraîche mixture in 2 additions, beginning and ending with dry ingredients; beat just until combined. Do not overmix. Scrape batter into prepared pan, smooth top, and sprinkle with sliced almonds.

5. Bake cake until golden brown and a tester inserted into the center comes out clean, 55–65 minutes. (Tent with foil if browning too quickly.) Transfer pan to a wire rack and let cake cool in pan for 15 minutes. Using parchment overhang, gently remove cake from pan and transfer to rack; let cool completely.

Design a site like this with WordPress.com
Get started